
AutoCAD Drawing File Cleaning Procedure
CAD Tip 1032
Many times you will receive an AutoCAD drawing file that is corrupted. It has some sort of glitch in its data. This can happen, for example, when the drawing was created in a non-AutoCAD software environment. Many software packages claim to be AutoCAD-compatible, when in fact they have only limited ability to export a good DWG file.
Corruption can also occur when you use AutoCAD tools in non-standard ways, accidentally or intentionally, such as creating a text object that has no text in it, or making a zero-length line.
If you don’t remove the corrupt elements, the drawing may crash your computer or misbehave in other unpredictable and frustrating ways.
Fortunately, cleaning a corrupted file is usually easy. I think it’s important to check regularly to make sure your dwg format file is clean and free of glitches.
IMHO, a professional CAD artist has a responsibility not to leave a corruption problem uncorrected, because it can turn into wasted man-hours and lost productivity, both for the current file user (you), and also for other CAD people who work with the drawing file further down the line. Remember, your output is your reputation.
Whenever I receive a file from an outside source that I am not totally confident of, I check and “clean” the drawing file before using it or passing it along to a team member. First, I save the original file in its unedited form to an archive folder. Then I create a copy of the file named something like ABC-corp-plan-clean.dwg. This is easily done using Big-Red-A > Save As > Drawing. (Yes, there is a more officially correct name for the Big-Red-A at the top left corner of the AutoCAD interface, but I prefer Big-Red-A.)
Next, I check the external references list for any issues. Open the External References palette by either typing XR [ENTER] or by clicking on the angled arrow at the bottom right of the Insert Tab > Reference Panel. If any of the references have a status of Unreferenced, detach them (Select the reference, right-click, choose “Detach”) or fix the path if it’s needed. See the image below.
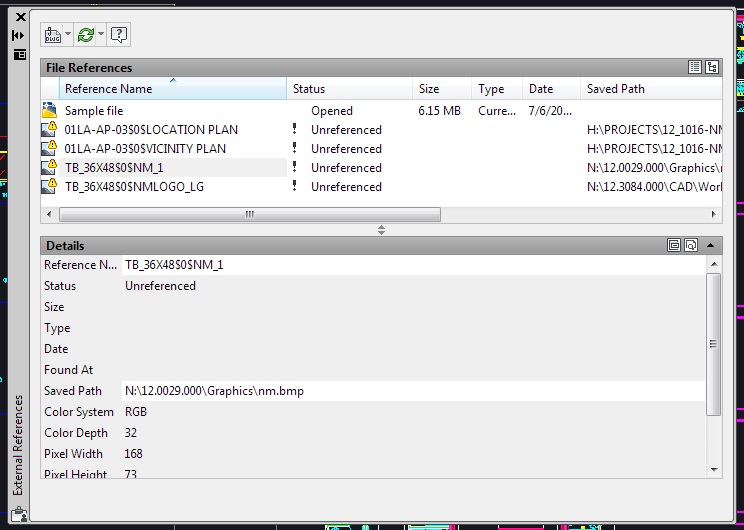
External References dialog box
Then I “clean” the drawing using this Basic Cleaning Procedure:
- Turn all layers on. Either type LAYON [ENTER], or go Home Tab > Layers Panel > Pull-down menu > Turn All Layers On.
- Thaw all layers. Either type LAYTHW [ENTER], or go Home Tab > Layers Panel > Pull-down menu > Thaw All Layers.
- Unlock all layers. There are a few ways to do this. If the list is short, just pull down the layer list and look for the yellow “Locked” icon. If the list is longer, open the Layer Properties Manager by going Home Tab > Layers Panel > Layer Properties. Sort the layers by Locked/Unlocked status by clicking on the title of the “Lock” column, then check the top and bottom of the list. Unlock any locked layers by clicking on the lock icon.
- Determine if any layers have nothing but unwanted “junk” on them. With the Properties widow open (hit [Ctrl]-1), select items that you don’t want to import into the “good” drawing and note their layer status.
- Isolate each “junk” layer and delete all of the objects on it. This can be done with multiple layers at once, but be careful — you don’t want to erase important information by mistake! Type LAYISO [ENTER], or go Home Tab > Layers Panel > Isolate. If the layer is all junk, you can select all objects using [Ctrl]-A, then hit the Delete key. Click on Unisolate to get the layers turned back on. Repeat this step until all of the “junk” layers are empty.
- Erase any other objects you don’t want to bring into the new drawing. This may be done one object at a time, or use a tool such as Quick Select — see Tip number 1019.
- Run Purge. Type PURGE [ENTER]. Click Purge All > Purge all items, possibly more than once if needed. Close the Purge window. See the image below.
- Run Audit. Type AUDIT [ENTER]. AutoCAD asks if you want it to fix any errors detected. Click on Yes or type Y [ENTER]. Watch the command line (you can open the text window using the F2 key) to see how many errors were detected and fixed. Repeat Audit until the “errors found” number equals zero. See the image below.
- Repeat Purge, and this time look through each category of purge-able elements carefully. See if any purge-able items show up. Be particularly alert for blocks or layers with the dollar sign ($) as part of their name. This is very likely a corrupt element. Also watch for any layers with “AUDIT-BAD-LAYER” in the layer name. Be sure to purge these rogue layers, blocks, linetypes, etc.
- Repeat Audit. See if any errors show up, and whether they were successfully fixed by AutoCAD. If you have one or more errors, repeat Purge and Audit again.
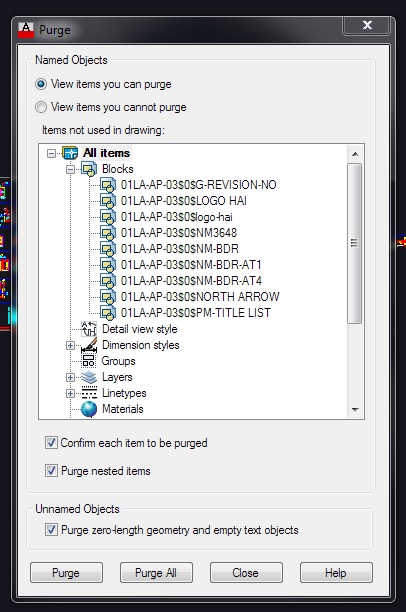
Purge dialog box with suspicious blocks

Results of an Audit operation showing fifteen errors
If you are still getting errors or purge-able elements, then you have a seriously stubborn corrupted DWG file. You will need to use my Advanced Cleaning Method.
Watch for next week’s post, in which I will share that advanced cleaning strategy.
Keep on CADDing! 🙂
Mark
Yes could you tell me how to get out a custom text that was in from other company that say items that want purge.
email: lynn.bishop@worleyparsons.com